Be sure to check out
- Kubernetes Overview: Part-1 [ Basics of Kubernetes and its components]
In the previous part of this series, we spoke about the basics of Kubernetes and Kubernetes Components on a high level. In this section, we will cover Kubernetes Objects.
Kubernetes Objects
Kubernetes objects are persistent entities in the Kubernetes system, which means that Kubernetes works to maintain a running state of that object in the cluster.
Every Kubernetes object is defined by a spec (usually a .yaml file), you have to set this when you create the object, describing the characteristics you want the resource to have: its desired state.
Here's an example .yaml file that shows the required fields and object spec for a Kubernetes Deployment. More on Deployment in the upcoming sections.
apiVersion: apps/v1
kind: Deployment
metadata:
  name: nginx-deployment
spec:
  selector:
    matchLabels:
      app: nginx
  replicas: 2
  template:
    metadata:
      labels:
        app: nginx
    spec:
      containers:
      - name: nginx
        image: nginx:latest
        ports:
        - containerPort: 80
Don't stress about the fields in this for now. But although, you might be familiar with some of the terms like container and image if you have worked with Docker.
Now, we'll go through some of the most common Kubernetes Objects in the order that you would normally create them.
Pod
Pods are the smallest deployable units of computing that you can create and manage in Kubernetes. A pod is a group of one or more containers, with shared storage and network resources.
A Pod is similar to a set of containers with shared namespaces and shared filesystem volumes.
Sample Pod .yaml file where you define the container that will be running in the Pod.
apiVersion: v1
kind: Pod
metadata:
  name: nginx
spec:
  containers:
  - name: nginx
    image: nginx:latest
    ports:
    - containerPort: 80
Deployment
A Deployment object is used to describe the desired state of your application and Kubernetes strives to maintain that desired state. For example, you could specify that you need 2 replicas of your application running at all times and Kubernetes will spin up another instance of your application in case an instance goes down.
You could do the following with a Deployment Object.
Create a Deployment to rollout a ReplicaSet.
Update Pod template: You could update pod template in a Deployment file and Kubernetes will update the pods in belonging to that Deployment one at a time.
Rollback to an earlier revision if the current state of the Deployment is not stable.
Scale up the Deployment.
Pause the rollout and resume it to start a new rollout.
A Deployment .yaml file is already shown above with kind: Deployment
Service
Service is an abstract way to expose your application outside the cluster.
Pods could get deleted or scaled up in which case you shouldn't be worried about how you would access those pods. Service gives you a layer of abstraction over these Pods. So essentially you hit the Service which decides to which Pod your request must be forwarded.
Services are usually created in one of two ways:
ClusterIP: Exposes the application within the cluster, It is only accessible from within the cluster with the help of its virtual IP address.
NodePort: Exposes the application outside the cluster by opening a specific port on each node in the cluster (default: 30000-32767). Using NodePort gives you the flexibility to set up your load-balancing solution.
LoadBalancer: Services created with this type provisions a Load Balancer in your cloud environment. Traffic from the external load balancer is directed at the backend Pods. The cloud provider decides how it is load balanced.
ExternalName: Services created with this type map a Service to a DNS name instead of a Selector.
apiVersion: v1
kind: Service
metadata:
  name: name-of-the-service
spec:
  # we can access the service from outside the cluster
  type: NodePort
  # When the node receives a request on the static port (30111)
  # it forwards the request to a pod with below selector
  selector:
    app: name-of-the-pod-label
  ports:
    # Three types of ports for a service
    # nodePort - a static port assigned on each the node
    # port - port exposed internally in the cluster
    # targetPort - the container port to send requests to
    - nodePort: 30111
      port: 8080
      targetPort: 80
Ingress
Ingress exposes HTTP and HTTPS routes from outside the cluster to services within the cluster. Traffic routing is controlled by rules defined on the Ingress resource.
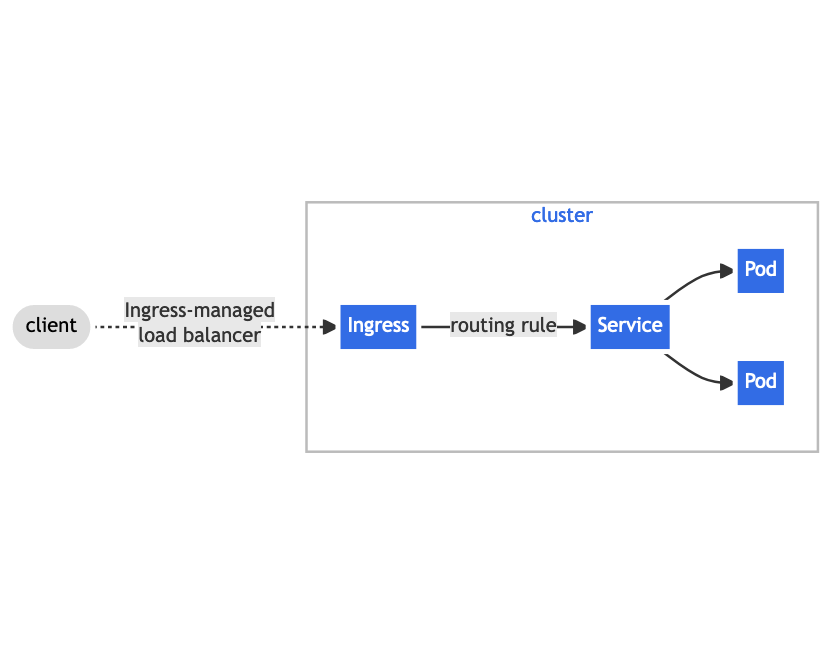
So, Ingress in itself is useless without an Ingress Controller. Ingress is just the routing rules, Ingress Controller is responsible for fulfilling the Ingress.
Each HTTP rule contains the following information:
An optional host.
A list of paths (for example,
/testpath), each of which has an associated backend defined with aservice.nameand aservice.port.nameorservice.port.number. Both the host and path must match the content of an incoming request before the load balancer directs traffic to the referenced Service.pathType: This could be
Exact,Prefixbased on your rule.A backend is a combination of Service and port names as described in the Service yaml definition. HTTP (and HTTPS) requests to the Ingress that match the host and path of the rule are sent to the listed backend.
apiVersion: networking.k8s.io/v1
kind: Ingress
metadata:
  name: minimal-ingress
  annotations:
    nginx.ingress.kubernetes.io/rewrite-target: /
spec:
  ingressClassName: nginx-example
  rules:
  - http:
      paths:
      - path: /testpath
        pathType: Prefix
        backend:
          service:
            name: test
            port:
              number: 80
Ingress Controller
As I mentioned earlier, for the Ingress resource to work, the cluster must have an ingress controller running.
Kubernetes as a project supports and maintains AWS, GCE, and nginx ingress controllers.
Let's take an example of AWS Load Balancer Controller.
AWS Load Balancer Controller is a controller to help manage Elastic Load Balancers for a Kubernetes cluster.
If an Ingress file is found, AWS Load Balancer Controller provisions an Application Load Balancer (ALB). Else, it provisions a Network Load Balancer in case of Service file.
Usually, we would have a single ALB which would distribute traffic to different APIs deployed based on Ingress rules.
That's all for this post !. You got to see some yaml files here but that's all for now. The next part will be a bit more hands on. So, get ready with your favourite Editor, Terminal and head over to Deploy a react app in Kubernetes [ Install kubectl, minikube, create and dockerise a react app and deploy it in kubernetes ]